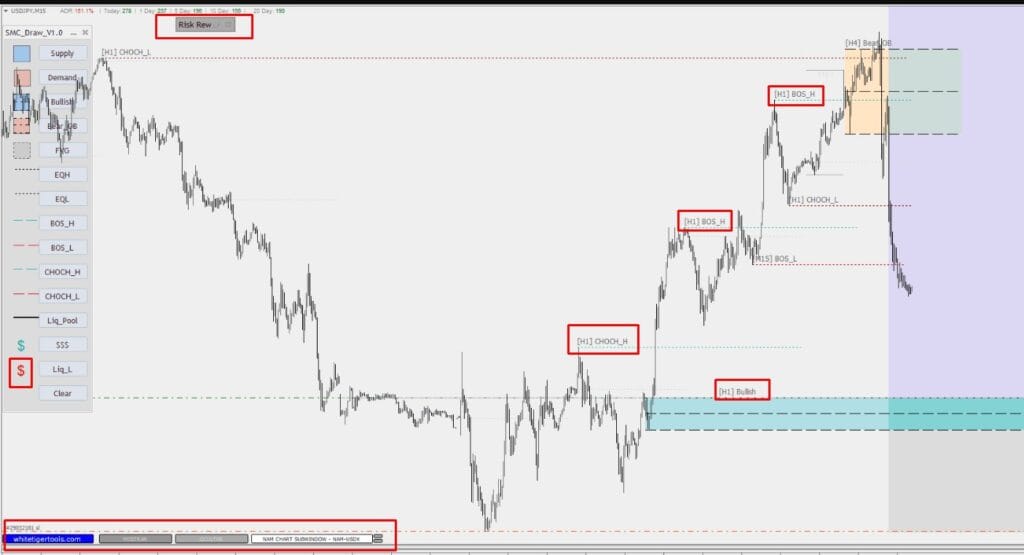
TL;DR: Order block trading strategy — identify institutional order blocks (supply/demand zones) on higher timeframes, then wait for controlled retraces and high-quality rejection or reclaim patterns on lower timeframes. Enter with pending orders or on confirmation candles, place SL beyond the zone, and manage TP with multi-leg exits or trailing. Use higher-TF alignment, volume confirmation, and strict position sizing (risk 0.5%–1% per trade).

Table of Contents
1. Introduction
The Order block trading strategy (smart-money concept) helps traders spot where large participants placed orders, creating pockets of imbalance that later act as supply or demand zones. When price returns to these areas, high-probability reactions (rejections, reclaim candles, or break-retests) often occur. This methodology turns institutional footprints into tradable setups with clear rules.
2. Strategy overview — Order block trading strategy summary
- Instrument: major FX pairs, liquid indices, and large-cap stocks.
- Higher TF: H4 / D1 to locate primary order blocks; lower TF M15–H1 for entries.
- Core idea: mark order blocks (last bearish/bullish candles before strong institutional moves); trade retraces/reclaims to those blocks with confirmed rejection or structure reclaim.
Download Target Indicator and apply the settings in this strategy to reproduce the signals.
3. Setup
- Identify order blocks on H4/D1: the last bullish candle before a sharp down move (bearish OB = supply) or the last bearish candle before a sharp up move (bullish OB = demand). Mark them as zones (wider rectangles).
- On M15–H1 monitor price approaches, wick behavior, and microstructure (rejection, engulf, reclaimed OB).
- Optional indicators: tick/volume to confirm institutional activity; moving average for broad trend alignment.
4. Trading rules
4.1 Filter / Bias
- Use higher-TF trend and structure: prefer longs into bullish order blocks within an uptrend and shorts into bearish order blocks within a downtrend. If higher TF disagrees, reduce size or skip.
4.2 Signal (order block signal types)
- Common high-probability signals:
- Rejection candle (pin, long wick) inside the order block zone.
- Reclaim / flip: price re-enters zone, forms structure that breaks and reclaims (close above/below block).
- Break-retest: order block broken, then price returns to retest and fails to continue past the retest.
- Prefer “fresh” order blocks (un-tested or tested once) for higher edge.
4.3 Entry
- Aggressive: limit order near the block edge (tightest entry).
- Conservative: wait for a confirmation candle close (rejection or reclaim) and enter market or use a breakout entry beyond the confirmation wick.
- Use pending stops when automation is used; otherwise trade discretionarily on clean confirmations.
4.4 Stop-loss
- Place SL beyond the zone: for demand (longs) SL a few pips below the block low; for supply (shorts) SL a few pips above the block high. Give the SL enough room to survive noise, but keep monetary risk within 0.5%–1% equity.
4.5 Take-profit & Trade Management
- TP options: fixed R:R legs (e.g., 1:1 then trail to 2:1), scale-out at structural pivots, or target next higher-TF level. Use ATR-based trailing on winners. Move part of position to breakeven after first target to reduce risk.
4.6 Invalidation
- Invalidate or reduce size if: the block is heavily retested (no longer fresh), volume signature contradicts the expected reaction, or a major news event is scheduled. Do not average into a violated order block.
5. Position sizing & Risk Management
- Risk per trade: 0.5%–1% of account equity. Derive lot size from SL distance.
- Limit the number of active trades and cap session exposure (e.g., max 2–3 order-block trades concurrently).
- Stop trading for the day after a pre-set drawdown (e.g., 2–3% equity).
6. Backtest & Validation
- Backtest the order block rules across multiple instruments and timeframes. Focus on “freshness” rules (how many tests before an OB loses edge). Record win rate, avg R:R, expectancy and max drawdown. Walk-forward test to avoid overfitting.
7. When NOT to trade
- Avoid trading when blocks are in thin-liquidity sessions or when spreads widen sharply.
- Skip blocks that have been tested repeatedly (low edge).
- Avoid trading around high-impact news or during very choppy markets.
8. Variations & Optimizations
- Multi-TF confluence: require an H4 order block aligned with a Daily structure for higher conviction.
- Order block + Volume: prefer blocks with obvious volume spike on the initiating move.
- Order block clusters: treat overlapping blocks across TFs as stronger zones.
- Automated scanner: use an OB scanner to highlight candidate blocks, then manually confirm structure before trading.
9. Pre-trade checklist
- Order block identified and marked (H4/D1).
- Trade aligns with higher-TF structure/trend.
- Entry signal (rejection/reclaim) confirmed on M15–H1.
- SL/TP and position size calculated (risk ≤ 1%).
- No imminent high-impact news and spreads acceptable.
10. Conclusion
A disciplined order block trading strategy translates institutional price footprints into actionable setups: identify fresh blocks, wait for clean retraces or reclaim patterns, enforce strict SL/TP rules, and size positions conservatively. The combination of higher-TF context and lower-TF confirmations yields repeatable, testable edge.
11. FAQ
Q: How many times can an order block be tested before it’s no longer valid?
A: There’s no fixed number — many traders treat a block tested 2+ times as weaker. Backtest to find your own freshness rules.
Q: Are order blocks the same as supply & demand zones?
A: Order blocks are a specific smart-money formulation of supply/demand zones (often the last candle before an institutional move); the concepts overlap but use slightly different construction and validation rules.

